Showing posts with label Web Service. Show all posts

Friday, May 7, 2021

How I made Mini Business Central in PowerApps?

I am going to split the content into the steps for better understanding.

Note: If you are new the PowerApps and don’t how to create the App then you can follow below steps in which Microsoft will create demo app using our Business Central web service, Based on that we can follow further.


Step 1: Click on the Other Data Source Button as per below image.


Step 2: We need to choose our Connection in this case I am going to choose Business Central web Services.


Step 3: Now Choose the Data Set.


Step 4: After choosing the Data Set we can choose our Entity of Business Central.


Step 5: That’s it now PowerApps will create one demo app automatically, so we can have better idea that how to create Form, Gallery, and navigation.


Above are the steps for the beginners, but now I am going to show you that what I have created?


As you can see in above page, it is looks same as Role Center Page of Business Central Right? Let’s move into the technical Area of this App. In this content I am sharing the main component details with you which I have used in this app.


Screen 1: Role Center Screen

As you can see in below image the left side is Component Area, and the Right side is the properties.


In the Role Center Screen I have used the Blank Screen and for Que I have used the Rectangle Components.


-        And in Bottom Part of the App you can see the 5 Options those are the button so you can navigate from this screen to anywhere you want.

-        Here’s the sample formula for navigate from one screen to other, Navigate(BrowseGallery1_1, ScreenTransition.None)

-        For Counting the Record from web service we have the formula like CountRows(vendors).

-        In PowerApps we have many formulas for all the operations.

One more thing I want to add is that Properties Let me show you one example for that.


As you can see I have added navigate formula on select trigger and into the text property added count formula.

Screen 2: List Screen

In this app I have tried to copy Business Central concept like Role Center, List Pages, Card Pages So, Let’s go through the List Pages.
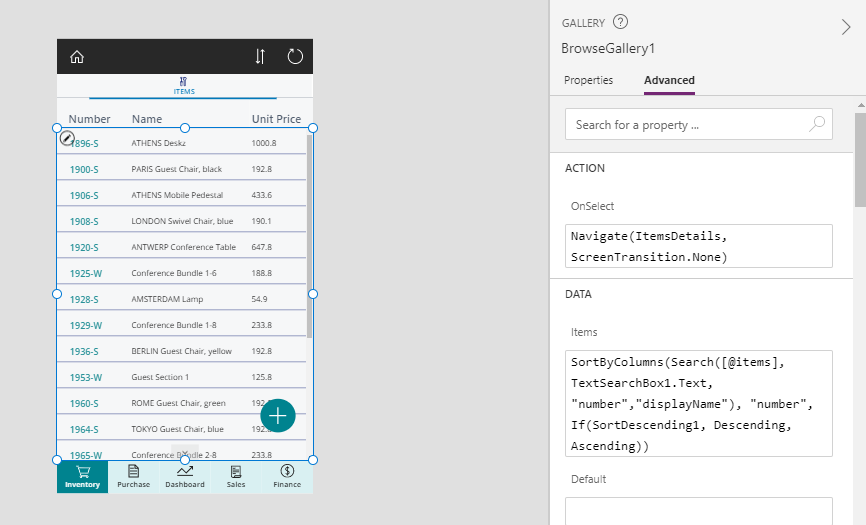


-        In this Screen I have used the components like Gallery, Icons as Button, Button, and Rectangle for Horizontal Line.

-        When we have more than one records to show on the screen at that time we can use Gallery components.

We just need to add the Vertical or Horizontal Gallery from Components and just need to add Data Source.


Once you click on that component it will ask you to select the Data Source.


-        As you can see in the Screen 2 I have added one floating button of Add, I will discuss about it later once we get to the New Form Part. Now let’s move on the Detail Screen.


Screen 3: Detail Screen


-         As you can see in above image, I have used One Icon for back to the previous screen, Edit Icon to navigate edit Screen, One Form, two or three Labels, Let’s talk about Form.

-        The Purpose of Detail screen is to show particular record in details, we cannot add all the fields at List level so, that is why we have added Form in which we can add as many fields we want.

-        How the form will identify that which record they need to open? For that we need to add one formula in Item Property BrowseGallery1.Selected we need to Gallery name and .Selected so the form will show the record which you have selected on Gallery.

-        Now, Let’s move on edit and back for Back icon I have one formula in which user can go to the previous page or any other page Back() by adding back it will let you go in previous page.

      To Edit a page we have formula EditForm(ItemEditForm_1);Navigate(ItemEditScreen, ScreenTransition.None) we just need to add edit form and form name after that we just need to add navigate formula in the icon.


Screen 4: Edit Screen


As you can see in above Image I have created new screen for Edit in which user can edit the records, and sent path request.

In this Screen we have used two buttons one for cancel edit, Submit changes, Edit Form. And never forgot to add the Item Property as per detail screen.

-        We just need to add FormMode.Edit to make all the fields are editable in the form.

-        For Submit we have one formula SubmitForm(ItemEditForm) Itemeditform is the name of form which we are using in this screen.

-        And for cancel icon we have added the formula ResetForm(ItemEditForm);Back().

So, that's it for the Business Central App in PowerApp.


Little Demo of App:


Wednesday, June 17, 2020

Covid Tracker

Developed extension in business central, which get the latest information of #COVID19 cases in selected country.


Friday, April 10, 2020

How to connect Power BI to Business Central?

To add Business Central as a data


Step 1: is to Download and Install Power BI Desktop version into your machine.
  - You can download by clicking on below link.
     https://powerbi.microsoft.com/en-us/downloads/
  - Click on Advanced download options.


Step 2: Open Power BI Desktop.
  -  In Power BI Desktop, choose Get Data and click on More under Home tab like below image. After that you can able to see Get Data form into Power.

Step 3: On the Get Data page, choose Online Services, choose Dynamics 365 Business Central, and then choose the Connect button.

Step 4: Power BI displays a wizard that will guide you through the connection process. You will be prompted to sign into Business Central. Select Sign in and choose the account you would like to sign in as. This should be the same account you sign into Business Central with. 

    -   Choose the Connect button to continue. The Power BI wizard shows a list of Microsoft Business Central environments, companies, and data sources. These data source represent all the web services that you have published from each tenant/company in Business Central.

Step 6: Specify the data you want to add to your data model, and then choose the Load button.
       -  Repeat the previous steps to add additional Business Central, or other data, to your Power BI data model.

-  Once the data is loaded it will appear in the right navigation on the page. At this point, you have successfully connected to your Business Central data and are ready to begin building your Power BI report.

Sample Report

-  As you can see in below image we have created one sample report called Sales By Item Category using Item Category Code and Sales Amount Actual fields.


Data Source

      -  The Power BI wizard only shows a list of Business Central environments, companies, and data sources. These data source represent all the web services that you have published from each tenant/company in Business Central.
      -  But if user want to use data source which is not available into Power BI then after we must Create Data Set into Business Central.


Steps for create Data Set into Business Central

Step 1: Open Web Services page and choose Create Data Set action under Actions > New Document.

Step 2: Click on Next button. After that it will ask you for below Operations.
-          Create a new data set
-          Create a copy of an existing data set
Edit an existing data set

Step 3: Choose Create a new data set option after that click on Next button.

 Step 4: Click on assisted setup in Name field and choose the web service after that click on Next.

 Step 5: Choose the fields which you want to use and click Publish.


  • Now we can use this data source into Power BI.


For more details: