Tuesday, August 3, 2021
How to modify the Role Explorer (Menu Suites) in Business Central?
For this we need to extend the standard Role Center page, Find the location of the particular action where you want to add your custom link. In my case I need to add the Custom action after the Customers action.
Here’s the location of customers action in Order Processor RC.
Here’s the custom action which we have added after the Customers action.
Let’s see the result:
Monday, May 10, 2021
Custom Connector to connect with Business Central
Note: If you don’t have any customization at business central then you can directly use the Data Source of Business Central, but if you have any customization in Business Central from scratch or extended fields then the Data Source of Business Central will not work for you. To access those custom fields and entities we need to create Custom Connector.
There are so many actions available in Custom Connector like Get, Delete, Post, Put, Head, Options and Patch. So, we are going to look at Get, Post, Patch and Delete.
Step 1: Click on Custom
Connector in PowerApps, now, click on New Custom Connector and after that
we need to Click on Create from Blank.
Step 2: Add the Name of your Custom Connector, You need to add multiple actions into the one Connector.
Step 3: Now Let’s Add Details in Custom Connector. We need to add Business Central Host in Custom Connector api.businesscentral.dynamics.com.
Step 4: Now move on the Security Tab and add User Name and Password after selecting the Authentication Type.
Now let’s move into the Definition tab
Get
Step 5: Let create Get action first to create get action we need to click on New Action Button as per below image. And need to add function name so it will be visible at PowerApp Side when we develop an app.
After adding the information we need to add the request information. In Request part need to click on the Import from sample.
Now, Click on the Get verb and When you add the URL at that
time don’t forgot to add variable for Company
Id without that the solution will
work as static. After adding all the information click on the Import Button.
Right now we are in the last step to complete the Get Action in which we need to add the default response from web service of business central.
Now you can test your custom connector from the last Test
tab. But let’s do that later before that let’s complete the other actions.
Post
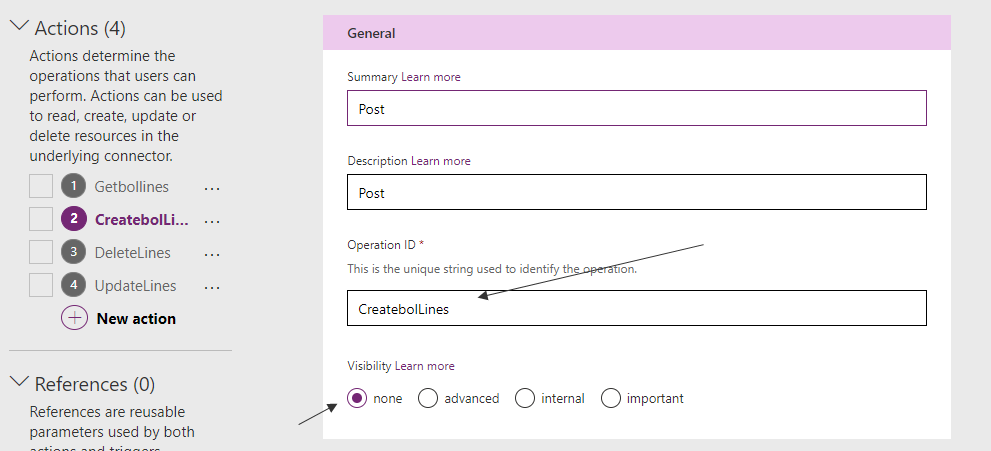
Same as the Get action we need to add name of the function and action in the General part.
After adding the information at General Tab we need to add the details into Request tab as below image. We need to select Post action and after that we need to add the URL and sample body which we are going to use in our PowerApps.
Now we need to do same thing into the response part.
Update
Update action will work the same way but for
this action we need to add parameters (filters) because business central need
if-match formula as well as the sample body and filters to identify which
records need to modify. So, let’s start with General Tab. Same as the above two
actions we need to add the function and action names into the General Tab.Delete
We are not going to show all the parts in delete
because it is working the same way as Patch just we need to add the all the
details from Patch action just one difference between these two is for Body,
Delete action will not have any Body.Friday, May 7, 2021
How I made Mini Business Central in PowerApps?
I am going to split the content into the steps for better understanding.
Screen 1: Role Center Screen
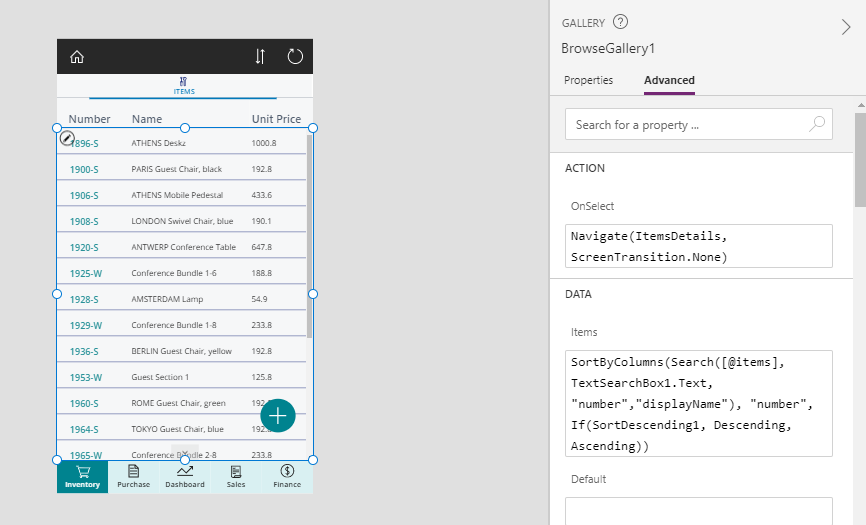
As you can see in below image the left side is
Component Area, and the Right side is the properties.In the Role Center Screen I have used the Blank Screen and for Que I have used the Rectangle Components.
- And in Bottom Part of the App you can see the 5
Options those are the button so you can navigate from this screen to anywhere
you want.
- Here’s the sample formula for navigate from one
screen to other, Navigate(BrowseGallery1_1,
ScreenTransition.None)
- For Counting the Record from web service we have
the formula like CountRows(vendors).
- In PowerApps we have many formulas for all the
operations.
Screen 2: List Screen
In this app I have tried to copy Business
Central concept like Role Center, List Pages, Card Pages So, Let’s go through
the List Pages.- In this Screen I have used the components like
Gallery, Icons as Button, Button, and Rectangle for Horizontal Line.
- When we have more than one records to show on
the screen at that time we can use Gallery components.
- As you can see in the Screen 2 I have added one
floating button of Add, I will
discuss about it later once we get to the New Form Part. Now let’s move on the
Detail Screen.
Screen 3: Detail Screen
- As you can see in above image, I have used One
Icon for back to the previous screen, Edit Icon to navigate edit Screen, One
Form, two or three Labels, Let’s talk about Form.
- The Purpose of Detail screen is to show
particular record in details, we cannot add all the fields at List level so,
that is why we have added Form in which we can add as many fields we want.
- How the form will identify that which record
they need to open? For that we need to add one formula in Item Property BrowseGallery1.Selected we
need to Gallery name and .Selected so the form will show the record which
you have selected on Gallery.
- Now, Let’s move on edit and back for Back icon I have one formula in which user can go to the previous page or any other page Back() by adding back it will let you go in previous page.
To Edit a page we have formula EditForm(ItemEditForm_1);Navigate(ItemEditScreen, ScreenTransition.None) we just need to add edit form and form name after that we just need to add navigate formula in the icon.
Screen 4: Edit Screen
In this Screen we have used two buttons one for cancel edit, Submit changes, Edit Form. And never forgot to add the Item Property as per detail screen.
- We just need to add FormMode.Edit
to make all the fields are editable in the form.
- For Submit we have one formula SubmitForm(ItemEditForm) Itemeditform is the name
of form which we are using in this screen.
- And for cancel icon we have added the formula ResetForm(ItemEditForm);Back().
So, that's it for the Business Central App in
PowerApp.
Little Demo of App:
Tuesday, April 7, 2020
MICR Font is not working in RDLC report of Business Central?
Hello All, Hope you all are doing well.
Today i am going to share the solution of MICR fonts in rdlc report of Business Central. I have seen many people are facing the issue of MICR font no display as Output in PDF only able to see in Word layout but that's wrong, Because I was also facing the same issue till last week. So, Let's see the solution.
Step 1:
I have started with Microsoft Docs in which they tell us to download the Demo fonts for development purpose as per below link.https://docs.microsoft.com/en-us/dynamics365-release-plan/2019wave2/dynamics365-business-central/micr-fonts-business-central-online
So, I followed the steps which are given by Microsoft and tried as below image.
Step 2:
-
Whenever there is need of installation of V2 custom extension, We have below two different ways to installation of extension V2. 1: W...
-
Hello All, Hope you all are doing well. Today i am going to share the solution of MICR fonts in rdlc report of Business Central. I hav...
-
Solution of the error while restoring the client NAV DB Steps for resolve Above Error: Step 1: Run Below Query to truncate user related tabl...